
Java has become a little bit of a nightmare to deploy and looking for answers on Google doesn’t make you much wiser since people states all kinds of things in different forums. Therefore, I’m going to make my best to clarify how it works in Java 6 (1.6.0). Previous versions (1.5.0) supported silent install switches like JAVAUPDATE=0. However I’ve been reading through the silent switches documentation for Java 1.6.0 and have been unable to find anything equivalent at all to what they had back in the days…
This means that we will have to use more drastic methods and edit the registry to stop the Java Auto Updater. But first, we need to grab the correct installer. Do this by visiting Oracles website. Grab the Offline-installer. I noticed that you only will be able to see the 64-bit version if you’re running a 64-bit OS. I will show you further down that the difference between the x86 installer and the x64 installer is quite big.
Now it’s a little bit up you if you want to disable Java directly in the installation or by using a GPO or GPP. If you’re going to use GPO/GPP, simply install Java by using the /s switch. Like this:
jre-6u24-windows-i586-s.exe /s (Remember that you’re probably will be using a different version)
If you’re going to disable Java directly, add this information into a .bat-file and put it right beside the Java installer (jre-6u24-windows-i586-s.exe):
Start /wait jre-6u24-windows-i586-s.exe /s
Start /wait means that the installer needs to finish before the .bat-file starts processing the next command line.
Next, we need to edit the registry to disable the Java Auto Update “feature”.
This parameter is located in different locations depending on what architecture of Windows you are using and what version of Java you have installed. However, something really important to know is that the Java x64 doesn’t have an Auto Updater. This means that you’re good to go if this is the version you’re planning to use!
The below table describes the different location scenarios of the registry key you need to change:
| OS Architecture | Java Version | Registry Path |
| Windows x86 | Java x86 | HKEY_LOCAL_MACHINE\SOFTWARE\JavaSoft\Java Update\Policy |
| Windows x64 | Java x86 | HKEY_LOCAL_MACHINE\SOFTWARE\Wow6432Node\JavaSoft\Java Update\Policy |
| Windows x64 | Java x64 | No Java Update feature included in installation. |
The magic key that you need to change is:
EnableJavaUpdate=0
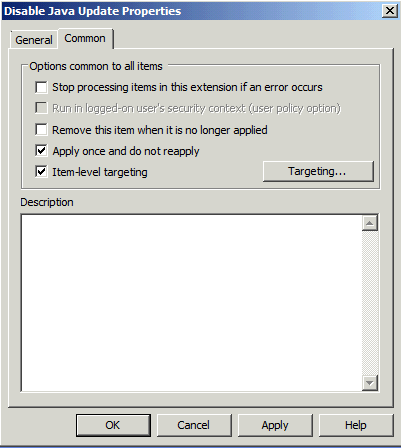
If you’re going to use a GPP, I would say that you’re quite set now. Just add the registry information above to a GPP registry update policy. It might be a good idea to select the box to “Apply once and to not reapply” on the Common tab. You can also use Item-level targeting to look for the current registry value, EnableJavaUpdate=1, to ensure that the policy only strikes on computers with this issue.
However, if you’re going to disable Java Update directly in the installation, create a .reg file containing the following information and save it right beside the .bat file you previously created:
Windows Registry Editor Version 5.00
[HKEY_LOCAL_MACHINE\SOFTWARE\JavaSoft\Java Update\Policy]
“EnableJavaUpdate”=dword:00000000
[HKEY_LOCAL_MACHINE\SOFTWARE\Wow6432Node\JavaSoft\Java Update\Policy]
“EnableJavaUpdate”=dword:00000000
Yes, this will add a little bit more information to the registry than you might need if you’re planning to use only x86 or x64, so feel free to edit it to match your environment.

Now you need to add the .reg file to your .bat file. Do this by entering the following information into the .bat file:
regedit.exe /s disableupdate.reg

Also ensure that your folder containing all necessary files now look something like this:

You’re done! Simply execute the .bat file in your deployment solution to deploy Java without Java Auto Update. You can of course this in any deployment solution like SCCM or Altiris but here’s a sample of how it looks in MDT:

This is a better way to do it man
Make some folders with sub-folders
Make Install folder
under here make 2 folders, scripts and system
inside system folder put jre-6u24-windows-i586.exe (from filehippo)
inside scripts folder make a file called javainstall.au3 (use notepad)
paste this code into javainstall.au3
========================
Opt(“TrayIconDebug”, 1)
$g_szVersion = “SmartNet”
If WinExists($g_szVersion) Then Exit ; It’s already running
AutoItWinSetTitle($g_szVersion)
HotKeySet(“{ESC}”, “MyExit”)
Func MyExit()
Exit
EndFunc
;#requireadmin
$type = “System”
$exe = “jre-6u24-windows-i586.exe”
$dirrem = “jre1.6.0_24”
$titlepre = “nul”
$title = “nul”
$processname = $exe
$uninstallkey = “{26A24AE4-039D-4CA4-87B4-2F83216024FF}”
$displayname = “Java(TM) 6 Update 24”
$displayversion = “6.0.240”
;OLD VERSION UNINSTALLER
$Array = StringSplit(“{7148F0A8-6813-11D6-A77B-00B0D0142000},{7148F0A8-6813-11D6-A77B-00B0D0142010},” & _
“{7148F0A8-6813-11D6-A77B-00B0D0142020},{7148F0A8-6813-11D6-A77B-00B0D0142030},{7148F0A8-6813-11D6-A77B-00B0D0142040},” & _
“{7148F0A8-6813-11D6-A77B-00B0D0142050},{7148F0A8-6813-11D6-A77B-00B0D0142060},{7148F0A8-6813-11D6-A77B-00B0D0142070},” & _
“{7148F0A8-6813-11D6-A77B-00B0D0142080},{7148F0A8-6813-11D6-A77B-00B0D0142090},{7148F0A8-6813-11D6-A77B-00B0D0142100},” & _
“{7148F0A8-6813-11D6-A77B-00B0D0142110},{7148F0A8-6813-11D6-A77B-00B0D0142120},{7148F0A8-6813-11D6-A77B-00B0D0142130},” & _
“{7148F0A8-6813-11D6-A77B-00B0D0142140},{7148F0A8-6813-11D6-A77B-00B0D0142150},{7148F0A8-6813-11D6-A77B-00B0D0142160},” & _
“{3248F0A8-6813-11D6-A77B-00B0D0150000},{3248F0A8-6813-11D6-A77B-00B0D0150010},{3248F0A8-6813-11D6-A77B-00B0D0150020},” & _
“{3248F0A8-6813-11D6-A77B-00B0D0150030},{3248F0A8-6813-11D6-A77B-00B0D0150040},{3248F0A8-6813-11D6-A77B-00B0D0150050},” & _
“{3248F0A8-6813-11D6-A77B-00B0D0150060},{3248F0A8-6813-11D6-A77B-00B0D0150070},{3248F0A8-6813-11D6-A77B-00B0D0150080},” & _
“{3248F0A8-6813-11D6-A77B-00B0D0150090},{3248F0A8-6813-11D6-A77B-00B0D0150100},{3248F0A8-6813-11D6-A77B-00B0D0150110},” & _
“{3248F0A8-6813-11D6-A77B-00B0D0150120},{3248F0A8-6813-11D6-A77B-00B0D0150130},{3248F0A8-6813-11D6-A77B-00B0D0150140},” & _
“{3248F0A8-6813-11D6-A77B-00B0D0160000},{3248F0A8-6813-11D6-A77B-00B0D0160010},{3248F0A8-6813-11D6-A77B-00B0D0160020},” & _
“{3248F0A8-6813-11D6-A77B-00B0D0160030},{3248F0A8-6813-11D6-A77B-00B0D0160040},{3248F0A8-6813-11D6-A77B-00B0D0160050},” & _
“{3248F0A8-6813-11D6-A77B-00B0D0160060},{3248F0A8-6813-11D6-A77B-00B0D0160070},{3248F0A8-6813-11D6-A77B-00B0D0160080},” & _
“{3248F0A8-6813-11D6-A77B-00B0D0160090},{26A24AE4-039D-4CA4-87B4-2F83216010FF},{26A24AE4-039D-4CA4-87B4-2F83216011FF},” & _
“{26A24AE4-039D-4CA4-87B4-2F83216012FF},{26A24AE4-039D-4CA4-87B4-2F83216013FF},{26A24AE4-039D-4CA4-87B4-2F83216014FF},” & _
“{26A24AE4-039D-4CA4-87B4-2F83216015FF},{26A24AE4-039D-4CA4-87B4-2F83216016FF},{26A24AE4-039D-4CA4-87B4-2F83216017FF},” & _
“{26A24AE4-039D-4CA4-87B4-2F83216018FF},{26A24AE4-039D-4CA4-87B4-2F83216019FF},{26A24AE4-039D-4CA4-87B4-2F83216020FF},” & _
“{26A24AE4-039D-4CA4-87B4-2F83216021FF},{26A24AE4-039D-4CA4-87B4-2F83216022FF},{26A24AE4-039D-4CA4-87B4-2F83216023FF}”, “,”)
For $i = 1 to $Array[0]
Local $InstallCheck = RegRead(“HKLM\SOFTWARE\Microsoft\Windows\CurrentVersion\Uninstall\” & $Array[$i], “”)
If @error == -1 Then RunWait(“msiexec /qn /x ” & $Array[$i])
Next
$Array = StringSplit(“{26A24AE4-039D-4CA4-87B4-2F83216010F0},{26A24AE4-039D-4CA4-87B4-2F83216011F0},” & _
“{26A24AE4-039D-4CA4-87B4-2F83216012F0},{26A24AE4-039D-4CA4-87B4-2F83216013F0},{26A24AE4-039D-4CA4-87B4-2F83216014F0},” & _
“{26A24AE4-039D-4CA4-87B4-2F83216015F0},{26A24AE4-039D-4CA4-87B4-2F83216016F0},{26A24AE4-039D-4CA4-87B4-2F83216017F0},” & _
“{26A24AE4-039D-4CA4-87B4-2F83216018F0},{26A24AE4-039D-4CA4-87B4-2F83216019F0},{26A24AE4-039D-4CA4-87B4-2F83216020F0},” & _
“{26A24AE4-039D-4CA4-87B4-2F83216021F0},{26A24AE4-039D-4CA4-87B4-2F83216022F0},{26A24AE4-039D-4CA4-87B4-2F83216023F0}”, “,”)
For $i = 1 to $Array[0]
Local $InstallCheck = RegRead(“HKLM\SOFTWARE\Microsoft\Windows\CurrentVersion\Uninstall\” & $Array[$i], “”)
If @error == -1 Then RunWait(“msiexec /qn /x ” & $Array[$i])
Next
$uninstallname = RegRead(“HKLM\SOFTWARE\Microsoft\Windows\CurrentVersion\Uninstall\” & $uninstallkey, “DisplayName”)
$uninstallversion = RegRead(“HKLM\SOFTWARE\Microsoft\Windows\CurrentVersion\Uninstall\” & $uninstallkey, “DisplayVersion”)
;msgbox(0,””,”uninstall name = ” & $uninstallname)
;msgbox(0,””,” display name = ” & $displayname)
;msgbox(0,””,” display version = ” & $displayversion)
;msgbox(0,””,”uninstall version = ” & $uninstallversion)
;If $uninstallname == $displayname then
If $uninstallversion $displayversion then
Install()
EndIf
;EndIf
Exit
Func Install()
If Not ProcessExists($processname) Then
Run(@ScriptDir & “\..\” & $type & “\” & $exe & ” /s”)
EndIf
While ProcessExists($processname)
Sleep(500)
WEnd
RunWait(@ProgramFilesDir & “\Java\jre6\bin\jqs.exe” & ” -unregister”)
RegDelete(“HKEY_LOCAL_MACHINE\SOFTWARE\Microsoft\Windows\CurrentVersion\Run”,”SunJavaUpdateSched”)
RegDelete(“HKEY_LOCAL_MACHINE\SOFTWARE\JavaSoft\Java Update\Policy”,”PromptAutoUpdateCheck”)
RegDelete(“HKEY_LOCAL_MACHINE\SOFTWARE\JavaSoft\Java Update\Policy”,”Frequency”)
RegDelete(“HKEY_LOCAL_MACHINE\SOFTWARE\JavaSoft\Java Update\Policy”,”UpdateSchedule”)
RegWrite(“HKEY_LOCAL_MACHINE\SOFTWARE\JavaSoft\Java Update\Policy”, “EnableJavaUpdate”, “REG_DWORD”, “0”)
RegWrite(“HKEY_LOCAL_MACHINE\SOFTWARE\JavaSoft\Java Update\Policy”, “NotifyDownload”, “REG_DWORD”, “0”)
RegWrite(“HKEY_LOCAL_MACHINE\SOFTWARE\JavaSoft\Java Update\Policy”, “NotifyInstall”, “REG_DWORD”, “0”)
DirRemove(@AppDataDir & “\Sun\Java\” & $dirrem,1)
DirRemove(@AppDataDir & “\LocalLow\Sun\Java\” & $dirrem,1)
EndFunc
==================
Execute this by puting autoit.exe into the scripts folder and make a batch to execute it eg
install.cmd
start /wait AutoIt3 javainstall.au3
anyway the autoit script silently installs, firstly removes old versions and then turns off all auto updates and silent services eg
GOOD LUCK!
Scripts are very nice to use – if you can maintain them. Not everyone can script, so other options is required sometimes. This is a nice script however, thanks!
The link to the silent switches documentation for Java 1.6.0 is broken.
Anyway I’m not sure but I’ll try if JAVAUPDATE=0 still works with the .msi, I never use the exe.
Do you mean this link? It works for me.